1.0 HTTP/2
Go 언어는 2016년 2월에 발표된 1.6 버전부터 기본으로 HTTP/2 지원이 내장되어 있다. HTTPS 통신을 한다고 설정하는 것만으로, NPN/ALPN 니고시에이션 후보에 HTTP/2를 나타내는 h2가 추가된다. 클라이언트와 서버 모두 니고시에이션에서 상대방이 HTTP/2를 지원한다는 것을 확인할 수 있으면 HTTP/2로 통신한다.
[HTTP 프로토콜 버전 확인 (Go 코드)]
package main
import (
"fmt"
"net/http"
)
func main() {
resp, err := http.Get("https://google.com/")
if err != nil {
panic(err)
}
defer resp.Body.Close()
fmt.Printf("Protocol Version: %s\n", resp.Proto)
}
당연히 Go 언어의 HTTP/2 지원은 환경 변수로 제어할 수 있다. (GODEBUG 환경 변수를 통해 제어 가능)
2.0 HTTP/2의 서버 푸시
Go 언어는 1.8부터 서버 푸시를 지원했다.
[서버 푸시 이용 방법 (Go 코드)]
func handler(w http.ResponseWriter, r *http.Request) {
pusher, ok := w.(http.Pusher)
if ok {
pusher.Push("/style.css", nil)
}
// 일반 이벤트 핸들러 처리
}청크 형식의 전송 지원에서는 http.ResponseWriter를 http.Flusher로 캐스팅해 특수한 메서드 Flush()에 액세스했지만, HTTP/2의 서버 푸시는 http.Pusher로 캐스팅해 사용한다.
[서버 푸시 구현]
package main
import (
"fmt"
"io/ioutil"
"net/http"
)
var image []byte
// 이미지 파일 준비
func init() {
var err error
image, err = ioutil.ReadFile("./image.png")
if err != nil {
panic(err)
}
}
// HTML을 브라우저로 송신
// 이미지를 푸시한다.
func handlerHtml(w http.ResponseWriter, r *http.Request) {
// Pusher로 캐스팅 가능하면(HTTP/2로 접속했다면) 푸시한다.
pusher, ok := w.(http.Pusher)
if ok {
pusher.Push("/image", nil)
}
w.Header().Add("Content-Type", "text/html")
fmt.Fprintf(w, `<html><body><img src="/image"></body></html>`)
}
// 이미지 파일을 브라우저로 송신
func handlerImage(w http.ResponseWriter, r *http.Request) {
w.Header().Set("Content-Type", "image/png")
w.Write(image)
}
func main() {
http.HandleFunc("/", handlerHtml)
http.HandleFunc("/image", handlerImage)
fmt.Println("start http listening :18888")
err := http.ListenAndServe(":18888", nil)
fmt.Println(err)
}핸들러는 HTML과 이미지를 모두 준비하고 있다. HTML에 액세스가 있을 때 이미지의 URL을 푸시한다.
Push() 메서드의 첫 번째 인수에 경로를 전달한다. 내부 동작으로는 의사적으로 서버 액세스를 발생시켜 /image.png 콘텐츠를 얻으면, PUSH_PROMISE 프레임으로 클라이언트에 보낸다. HTTP/1.1 코드와의 차이는 Pusher로 캐스팅하고 가능하다면 푸시하는 부분뿐이다. 최소한의 업데이트로 서버 푸시에 대응할 수 있고, 캐스팅할 수 있는지 확인하는 코드라면 호환성이 있으므로 HTTP/1.1 환경에서도 동작한다.
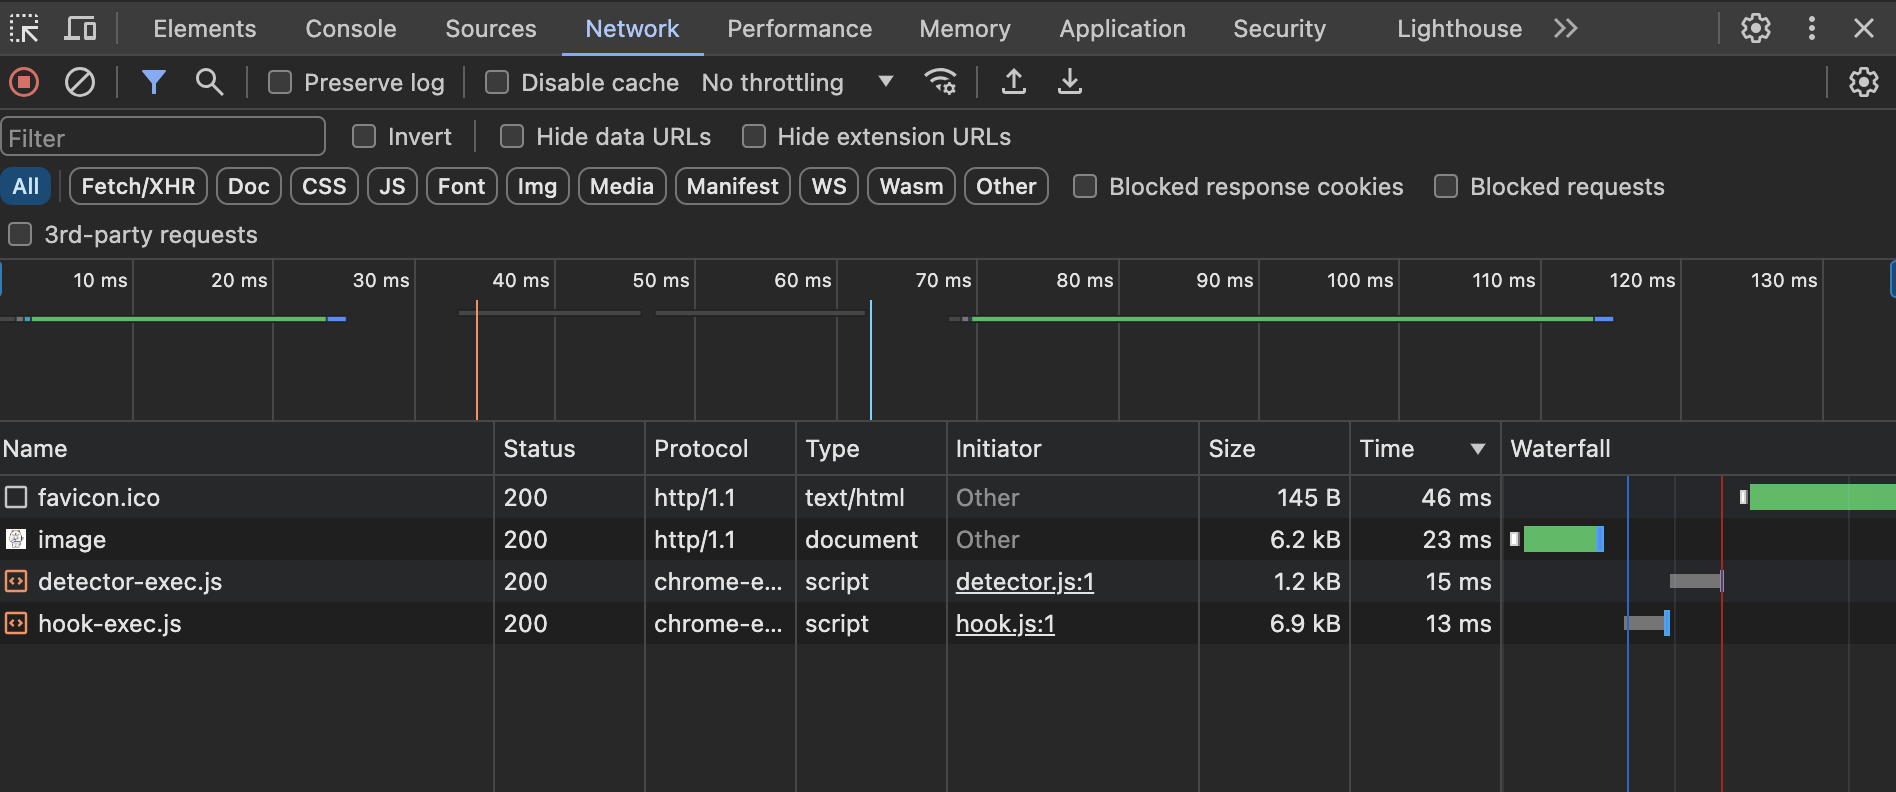
GODEBUG=http2server=0을 지정해서 HTTP/1.1에서 동작시켰을 때의 결과와 비교해보자. 크롬 개발자 도구의 네트워크 탭을 열어 비교해볼 수 있다. 왼쪽은 HTTP/1.1, 오른쪽은 HTTP/2 환경이다.
tls를 추가해 http/2 테스트는 이후에 해보자.
HTTP/1.1에서는 요청을 보낸 후 다은로드가 끝날 때까지 1.1밀리초 정도 걸린다. 또한 요청을 전송할 준비가 될 때까지의 대기시간도 2밀리초 걸린다. HTTP/2는 이미 다운로드가 끝나 로컬에 저장했기 때문에 큐에서 읽기만 하면 된다. 0.3밀리초정도 소모된다.
3.0 server-sent events
server-sent event는 청크 방식의 응용으로 http.Flusher를 사용하여 구현할 수 있다.
3.1 서버 구현
소수를 계속 표시하는 서비스를 만들어보자. 두 개의 파일로 나누어 구현한다.
- 서버
- HTML 뷰
우선은 서버 쪽이다. Go 언어 표준 라이브러리에서 확률론적으로 소수를 구하는 메서드 ProbableyPrime()을 사용한다.
[서버 코드]
package main
import (
"fmt"
"io/ioutil"
"math/big"
"net/http"
"time"
)
var html []byte
// HTML을 브라우저에 송신
func handlerHtml(w http.ResponseWriter, r *http.Request) {
// Pusher로 캐스팅 가능하면 푸시
w.Header().Add("Content-Type", "text/html")
w.Write(html)
}
// 소수를 브라우저에 송신
func handlerPrimeSSE(w http.ResponseWriter, r *http.Request) {
flusher, ok := w.(http.Flusher)
if !ok {
http.Error(w, "Streaming unsupported!", http.StatusInternalServerError)
return
}
closeNotify := w.(http.CloseNotifier).CloseNotify()
w.Header().Set("Content-Type", "text/event-stream")
w.Header().Set("Cache-Control", "no-cache")
w.Header().Set("Connection", "keep-alive")
w.Header().Set("Access-Control-Allow-Origin", "*")
var num int64 = 1
for id := 1; id <= 100; id++ {
// 통신이 끊겨도 종료
select {
case <- closeNotify:
fmt.Println("Connection closed from client")
return
default:
// do nothing
}
for {
num++
// 확률론적으로 소수를 구함
if big.NewInt(num).ProbablyPrime(20) {
fmt.Println(num)
fmt.Fprintf(w, "data: {\"id\": %d, \"number\": %d}\n\n", id, num)
flusher.Flush()
time.Sleep(time.Second)
break;
}
}
time.Sleep(time.Second)
}
// 100개가 넘으면 송신 종료
fmt.Println("Connection closed from server")
}
func main() {
var err error
html, err = ioutil.ReadFile("index.html")
if err != nil {
panic(err)
}
http.HandleFunc("/", handlerHtml)
http.HandleFunc("/prime", handlerPrimeSSE)
fmt.Println("start http listening :18889")
err = http.ListenAndServe(":18888", nil)
fmt.Println(err)
}정적 HTML을 반환하는 handler와 server-sent events 전송하는 handler를 정의했다.
[뷰(index.html)]
<!DOCTYPE html>
<html>
<head>
<meta charset="UTF-8" />
<meta name="viewport" content="width=device-width, initial-scale=1" />
<title>소수</title>
<script src="//unpkg.com/mithril/mithril.js"></script>
<script src="//unpkg.com/mithril-stream"></script>
</head>
<body>
<div id="root"></div>
<script>
const component = {
oninit: function (vnode) {
this.primes = stream([]);
const sse = new EventSource("/prime");
sse.onmessage = (event) => {
this.primes().splice(0, 0, JSON.parse(event.data));
m.redraw();
};
},
view: function () {
return m("div", [
m(
"ul",
this.primes().map((prime) => {
return m("li", { key: prime.id }, prime.number);
})
),
]);
},
};
m.mount(document.getElementById("root"), component);
</script>
</body>
</html>예제는 간결하게 표현하려고 클라이언트와 서버가 일대일로 되어 있다. 실제로는 채팅방 등 웹을 방문하는 여러 사용자 간 정보를 공유하기 위해 사용하는 경우가 많을 것이다. 그룹 간 사용자에게 데이터를 보내고자 사용자마다 만든 메시지, 클로즈 알림 채널을 배열로 관리해 메시지를 브로드캐스트하는 구조 등을 만들게 될 것이다.
3.2 클라이언트 구현
server-sent events는 구분 문자가 줄 바꿈이라는 것을 미리 알고 있는 청크 형식이므로, 이전에 배운 클라이언트 구현 방법 중 간편한 방법으로 구현할 수 있다.
[server-sent events 클라이언트 코드]
package main
import (
"bufio"
"bytes"
"context"
"fmt"
"io"
"net/http"
"os"
)
type Event struct {
Name string
ID string
Data string
}
func EventSource(url string) (chan Event, context.Context, error) {
req, err := http.NewRequest("GET", url, nil)
if err != nil {
return nil, nil, err
}
ctx, cancel := context.WithCancel(req.Context())
res, err := http.DefaultClient.Do(req)
if err != nil {
return nil, nil, err
}
if res.StatusCode != 200 {
return nil, nil, fmt.Errorf("Response Status Code should be 200, but %d\n", res.StatusCode)
}
events := make(chan Event)
go receiveSSE(events, cancel, res)
return events, ctx, nil
}
func receiveSSE(events chan Event, cancel context.CancelFunc, res *http.Response) {
reader := bufio.NewReader(res.Body)
var buffer bytes.Buffer
event := Event{}
for {
line, err := reader.ReadBytes('\n')
if err != nil {
close(events)
if err == io.EOF{
cancel()
return
}
panic(err)
}
switch {
case bytes.HasPrefix(line, []byte(":ok")):
//skip
case bytes.HasPrefix(line, []byte("id:")):
event.ID = string(line[4 : len(line)-1])
case bytes.HasPrefix(line, []byte("event:")):
event.Name = string(line[7 : len(line)-1])
case bytes.HasPrefix(line, []byte("data:")):
buffer.Write(line[6:])
case bytes.Equal(line, []byte("\n")):
event.Data = buffer.String()
buffer.Reset()
if event.Data != "" {
events <- event
}
event = Event{}
default:
fmt.Fprintf(os.Stderr, "Parse Error: %s\n", line)
cancel()
close(events)
}
}
}
func main() {
events, ctx, err := EventSource("http://localhost:18888/prime")
if err != nil {
panic(err)
}
for {
select {
case <- ctx.Done():
return
case event := <-events:
fmt.Printf("Event(ID=%s, Event=%s): %s\n", event.ID, event.Name, event.Data)
}
}
}
4.0 웹소켓
Go 언어용 웹소켓 구현은 여러 종류가 있다. 준표준 라이브러리(pkg.go.dev/golang.org/x/net/websocket)도 있지만, 이 준표준 라이브러리의 README에는 비 추천이라고 쓰여있다. 대체 라이브러리로 추천되는 것이 Go 언어의 웹 애플리케이션 프레임워크 Gorilla에서 제공하는 웹소켓 구현이다. 이 라이브러리는 서버와 클라이언트의 기능을 다 갖추고 있다.
사용법은 링크를 따라 들어가자.
4.1 서버 구현
[서버의 HTTP 핸들러 내에서 업그레이드]
var upgrader = websocket.Upgrader{} // use default options
func echo(w http.ResponseWriter, r *http.Request) {
c, err := upgrader.Upgrade(w, r, nil)
if err != nil {
log.Print("upgrade:", err)
return
}
}필수 헤더를 몇 개 꺼내 검증한 후, 프로토콜 업그레이드 절에서 소개한 http.Hijacker 메서드로 내부 소켓을 추출한다.
Upgrade() 메서드 내용
h, ok := w.(http.Hijacker)
var rw *bufio.ReadWriter
notConn, rw, err = h.Hijack()다음과 같은 응답 헤더를 포함하는 통신 응답을 작성한다. 그다음은 이 소켓을 직접 사용해 응답을 반환한다. 이것으로 업그레이드는 완료다. websocket.Conn은 net.Conn과의 호환성은 없지만, 비슷한 메서드를 몇 가지 갖추고 있다.
HTTP/1.1 101 Switching Protocols
Upgrade: websocket
Connection: Upgrade
업그레이드 완료 후, 통신에서 주로 사용하는 메서드는 다음 두 가지이다. 메시지 종류를 받고 반환하는 것 이외에는 net.Conn의 Read(), Write() 메서드와 같다.
[사용 방법]
// 쓰기 메서드
ws.WriteMessage(messageType int, data []byte) error
// 읽기 메서드
ws.ReadMessage() (messageType int, data []byte, err error)
4.2 클라이언트 구현
Go 언어의 표준 라이브러리 net.Dial을 본뜬 API로 간단히 접속할 수 있게 됐다.
[웹소켓의 클라이언트 코드]
c, _, err := websocket.DefaultDialer.Dial(u.string(), nil)ULR을 인수로 전달하면, 서버 절에서 소개한 것과 같은 websocket.Conn 소켓이 반한된다. 나머진 서버와 완전히 똑같은 API를 사용해 양방향 통신을 할 수 있다.
클라이언트에서 하는 일은 서버와 마찬가지로 프로토콜 업그레이드이다. net.Requset 구조체를 사용해 GET의 HTTP 요청을 상대의 URL이 가리키는 서버에 보낸다. 응답으로 스테이터스 코드 101이 오는지 확인한 후, 필요한 헤더를 가져와 클라이언트의 소켓 구조체를 초기화한다.
4.3 방의 구현
server-sent events든 웹소켓이든 커뮤니케이션을 위해 이용한다면 방 기능을 구현해야 한다. 해당 예제에서는 같은 URL에 액세스한 사람은 같은 방에 들어가지만, 대규모 서비스면 방에 들어가는 멤버를 선택하기 위한 로비도 필요하다.
Gorilla의 chat 예제에서는 'Hub'라는 이름의 방을 구현한다.
[방 구현]
type Hub struct {
// 등록된 클라이언트
clients map[*Client]bool
// 클라이언트가 보내는 메시지
broadcast chan []byte
// 클라이언트의 등록 요청
register chan *Client
// 클라이언트의 말소 요청
unregister chan *Client
}
// 초기화 후에 goruntine으로 실행되는 메서드
func (h *Hub) run() {
for {
select {
case client := <-h.register:
h.clients[client] = true
case client := <-h.unregister:
if _, ok := h.clients[client]; ok {
delete(h.clients, client)
close(client.send)
}
case message := <- h.broadcast:
for client := range h.clients {
select {
case client.send <- message:
default:
close(client.send)
delete(h.clients, client)
}
}
}
}
}초기화 시 클라이언트 목록을 관리하는 map과 클라이언트가 보내는 비동기 메시지를 수신하는 채널이 세 개(메시디, 등록, 말소) 있다. 메시지 브로드캐스트 채널에 메시지를 보내면 관리하는 모든 클라이언트의 소켓에 포워드한다. 접속 및 종료 처리도 하고 있다.
Reference
- 리얼월드 HTTP
'개발 서적 > 리얼월드 HTTP' 카테고리의 다른 글
| 클라이언트 시점에서 보는 RESTful API (0) | 2024.04.19 |
|---|---|
| 보안: 브라우저를 보호하는 HTTP의 기능 (0) | 2024.04.17 |
| HTTP/2의 시맨틱스: 새로운 활용 사례 (0) | 2024.04.09 |
| HTTP/2의 신택스 : 프로토콜 재정의 (0) | 2024.03.29 |
| Go 언어를 이용한 HTTP/1.1 클라이언트 구현 (0) | 2024.03.08 |